
Choose the Payload API version: v1 or v2
Payload, the payment provider behind REDA Pay, offers two versions of its programming interface. REDA Pay can use either, and the choice is made per Pay Profile with one field, Payload API Version. A profile left blank, or set to v1, works exactly as REDA Pay always has. A profile set to v2 uses Payload's current interface and, with it, the new payment screens: card and bank details typed into a secure form that Payload serves inside the screen, screens that run on every kind of Experience Cloud site, signed webhook messages, and your own colours and fonts.
This article explains what differs, how to decide, how to switch a profile, and how to switch it back.
- The Pay Profile exists with its API key stored — see Create a Pay Profile and store your Payload API key.
- You hold REDA Pay - Admin User. The field is edited by administrators only.
- If the field is not on your Pay Profile page, your org upgraded from an earlier version and the field has to be placed on the layout first — see Upgrading REDA Pay.
What differs between v1 and v2
| Topic | v1 (blank) | v2 |
|---|---|---|
| Payment screen inside Salesforce | The classic screen: the card or account form is part of the page | The v2 screen opens from the same button: method tiles, the amount panel, and a secure form served by Payload for the card number, security code and account number. Progress messages show what is happening |
| Where card and bank numbers go | Typed on the REDA Pay screen, sent to Payload, never stored | Typed into Payload's own form inside the screen; they never pass through Salesforce at all |
| Customer portal and public site pages | The classic components (NewPayOrder, NewPayOrderRequest …), which run on Aura sites only | The v2 components (REDA Pay - New Pay Order (v2) …), which run on Aura and LWR sites. A v2 profile needs the v2 components on its pages: the classic components refuse a v2 profile with "This page needs a Pay Profile on Payload API v2." |
| Webhooks | Ten webhooks at …/payload/…; Setup Webhooks removes every webhook under the API key | Eleven webhooks at …/payloadv2/…, optionally signed with a secret; Setup Webhooks removes only this profile's own webhooks |
| Appearance | Logo, header and footer from the processing account; fixed colours | The same, plus the host theme's colours by default and your own colours and font through Payment Appearance or the component settings |
| Earnest money deposits | Available | Refused: an EMD order cannot be created on a v2 profile |
| Records, customers, saved methods, orders, transactions | Identical. Both versions read and write the same records and Payload identifiers, so a customer created on v1 pays on v2 with the saved card, and the other way round | |
| Buttons, schedulers, reports, Apex API | Identical | |
How to decide
- A new installation: choose v2. It is Payload's current interface, and the secure form means your org never handles a card number.
- An org that already uses REDA Pay on Aura sites and inside Salesforce: staying on v1 changes nothing. Switch to v2 when you want the secure form, an LWR site, or signed webhooks — and plan the portal and public-site pages first, because a v2 profile needs the v2 components there.
- An LWR customer portal or public site: v2 is required; the classic components do not run on LWR pages.
- Earnest money deposits: keep that profile on v1.
You can run one profile on v1 and another on v2 in the same org. The screens read the version from the profile of the order being paid.
Switch a profile to v2
Do this in a sandbox first, then in production. The switch itself takes a minute; the pages and access it needs are the longer part, so read the whole list before you begin.
- Portal and public-site pages. If this profile serves a customer portal or a public payment-link site, place the v2 components on those pages and set the page names exactly, as described in Let customers pay in your portal and Set up the public payment-link site. Until the switch, the new pages sit beside the old ones; the classic pages keep working for v1.
- Access for your own profiles. If your users, portal users or the public site's guest user hold your own profiles or cloned permission sets instead of the packaged REDA Pay sets, grant the two classes and the page listed in Upgrading REDA Pay. Orgs that assign the packaged sets have them already.
- Webhook site guest. On the site that receives Payload's messages, enable the Apex class
rpay.PayloadCallbackV2for the guest user, next torpay.PayloadCallback— Set up webhooks, Part 2. - Set the version. Open the REDA Pay app → Pay Profiles → the profile → Edit. In Payload API Version choose v2. Save.
- Signing secret (recommended). Click Update Webhook Secret, type a secret of up to 64 characters that you keep somewhere safe, click Update Secret. The message "Webhook signing secret updated successfully. Run Setup Webhooks to apply it." confirms it.
- Register the webhooks again. Click Setup Webhooks and confirm. The profile's Webhook Setup tab now lists eleven rows whose addresses contain
/payloadv2/. - Republish each Experience Cloud site that hosts the v2 screens, if you placed them in step 1 without publishing.
- Test as each kind of payer: a staff user from a Lead, a portal user, and a guest opening a payment link. Card and bank details are entered in the secure form; the progress messages appear; the Pay Transaction is created; a few minutes later its status updates through the webhooks.
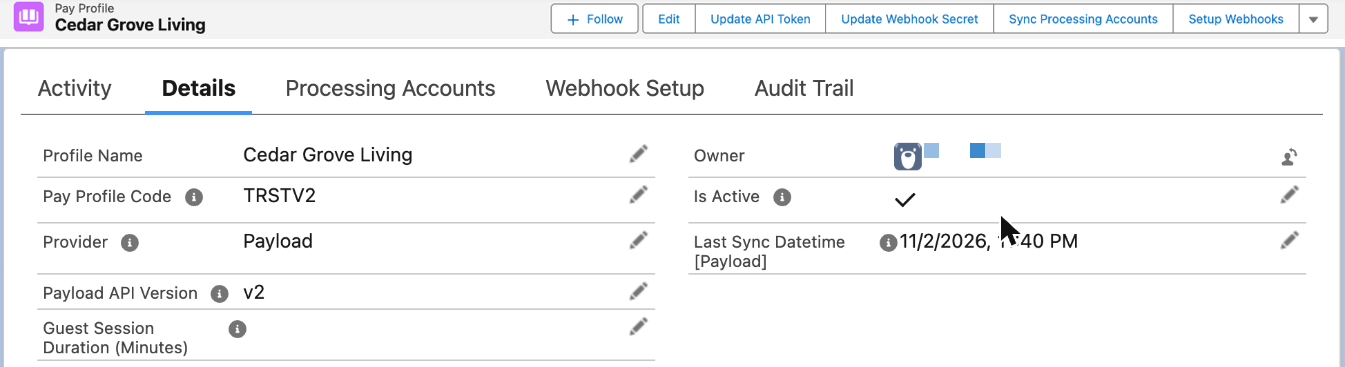
The version field and the three actions it works with. Everything else on the profile is unchanged.
Switch back to v1
Set Payload API Version to v1 (or clear it), save, and run Setup Webhooks again so Payload posts to the v1 address. No data changes. Pages that hold the v2 components stop working for this profile ("This page needs a Pay Profile on Payload API v2."), so point your portal navigation back at the classic pages first. Because Setup Webhooks on a v1 profile removes every webhook under the API key, re-register any other profile or system that shares that key afterwards.
What the switch does not do
- It does not move, copy or re-register customers, saved methods, orders or transactions. They are shared.
- It does not change your processing accounts, fees, branding, controls or link settings.
- It does not change which users may pay: the permission sets are the same.
- It does not replace the classic components on your pages. You place the v2 ones.
Mistakes to avoid
| Mistake | What happens | Fix |
|---|---|---|
| Switching to v2 before the portal or public pages hold the v2 components | Customers and link payers see "This page needs a Pay Profile on Payload API v2." | Place the v2 components first, or switch back until they are ready |
| Switching without running Setup Webhooks | Payload keeps posting to the v1 address; statuses stop updating | Run Setup Webhooks after every change of the version |
Webhook site guest without rpay.PayloadCallbackV2 | Payload's v2 messages are refused; statuses never update | Enable the class on the guest profile |
| Typing the signing secret into the Webhook Signing Secret field with Edit | The value is stored unencrypted and does not match what Payload signs with | Use the Update Webhook Secret action, then Setup Webhooks |
| Expecting earnest money deposits on v2 | The EMD order is refused | Keep an EMD profile on v1 |
FAQ
No. The same key serves both versions. REDA Pay adds the version to each request.
They press the same button. The screen that opens is the v2 one: tiles for saved methods, the secure form for a new card or account, and progress messages while the payment runs.
Yes. Create a second Pay Profile with the same API key, set it to v2, and limit a test page to it with Limit Profile Selection. Only one profile at a time receives Payload's webhooks for a shared key, so keep the test profile's webhooks for the test only.
Where to go next
- Set up webhooks — the v2 address, the signing secret and the guest class.
- Let customers pay in your portal — the v2 pages on an Aura or LWR site.
- Take a payment — the v2 screen step by step.